
Some computers are equipped with multiple graphics processors: an integrated GPU and a dedicated GPU (NVIDIA or AMD). In certain cases, Windows may automatically assign 3DEXPERIENCE applications to the integrated GPU, which can limit performance. To improve responsiveness and 3D display performance, you can manually configure 3DEXPERIENCE to use the high-performance graphics card.
Step 1: Configure the Preferred Graphics Card in Windows
-
Open the Windows Graphics Settings by navigating to: Settings > System > Display > Graphics.
-
Click Add an app and browse to the 3DEXPERIENCE executable:
C:\Program Files\Dassault Systemes\B428_Cloud\win_b64\code\bin\3DEXPERIENCE.exe
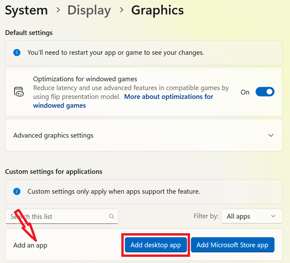
Depending on the installed version, the executable name may differ from the one shown above.
Tip :
If you cannot find the executable listed in this article:
-
Launch the relevant 3DEXPERIENCE application.
-
Open Task Manager (ctrl + maj + échap).
-
Locate the corresponding process.
- Right-click the process and select Open file location.
This will allow you to identify the exact executable path that should be configured.
Once the application has been added:
- Select the application from the list.
- Click Options.
- Choose High performance as the graphics preference.
- Save your changes.
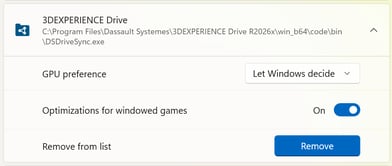
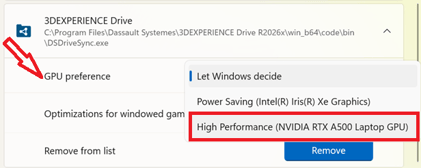
Don't forget to close and relaunch the 3DEXPERIENCE application for the changes to take effect.
Step 2: Force the Use of an NVIDIA Graphics Card
If your computer is equipped with an NVIDIA graphics card, it is recommended to configure it directly within the NVIDIA Control Panel as well.
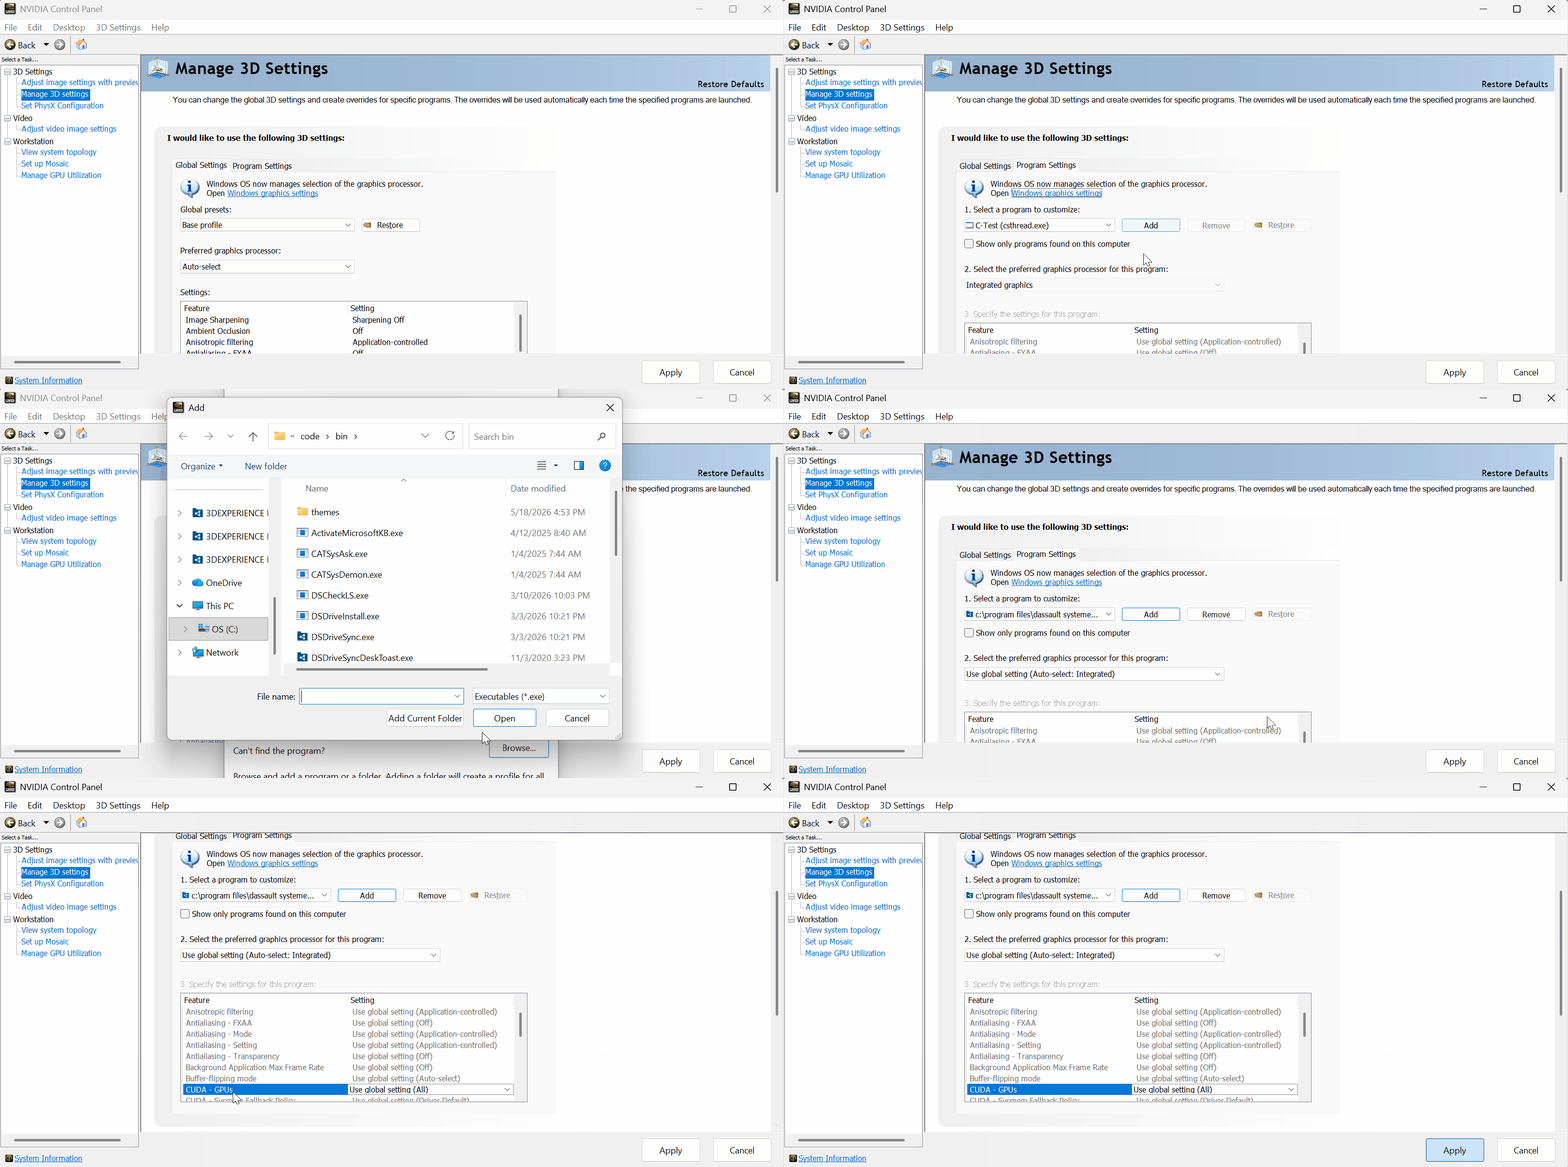
From the Windows desktop, right-click and select NVIDIA Control Panel.
Procedure
- Open Manage 3D Settings.
- Go to the Program Settings tab.
- Click Add.
- Select the 3DEXPERIENCE application or browse to its installation path.
- Ensure the selected graphics processor is your NVIDIA GPU.
- Verify that the CUDA settings are associated with the correct graphics card.
- Click Apply.
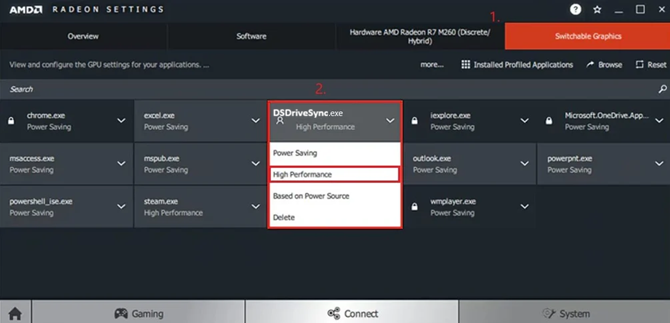
Step 3: Force the Use of an AMD Graphics Card
If your computer is equipped with an AMD graphics card, you can also configure the application through AMD's graphics management software.
From the Windows desktop, right-click and open AMD Software: Adrenalin Edition or AMD Radeon Settings.
Navigate to: System > Switchable Graphics.
Add the 3DEXPERIENCE application using the same executable path configured in the previous steps, then assign it the High Performance profile.
Step 4: Restart Your Computer
After configuring the graphics settings for 3DEXPERIENCE :
- Close all 3DEXPERIENCE applications.
- Restart your computer.
- Launch the application again.
Conclusion
3DEXPERIENCE will now make use of the most powerful graphics card available on your system !
Still Experiencing Graphics Issues?
1. Update Your Graphics Driver
Update your graphics card driver (for example, NVIDIA GeForce RTX or AMD Radeon Pro) to the latest version available from the manufacturer's website.
2. Review Your 3D Data
Performance issues and graphical lag can sometimes be caused by overly complex or poorly optimized 3D designs.
3. Use Certified Hardware
If performance issues persist, it may be necessary to upgrade to hardware better suited for 3DEXPERIENCE applications.
Check our list of certified workstations for SOLIDWORKS and 3DEXPERIENCE for the best user experience.