
By selecting the appropriate option during installation, you will be able to :
- Adjust your SOLIDWORKS installation later
- Add roles or components when needed
- Manage updates manually
The standard installation remains available, but it offers limited ability to make changes afterward.
Prerequisites :
Before starting, make sure your environment meets the following :
- A recent (ideally certified !) workstation
- Windows 11 Professional
- A supported browser such as Google Chrome or Microsoft Edge
SOLIDWORKS is not supported by macOS !
Step 1 : Activate 3DEXPERIENCE environment
- Open the email entitled : “3DEXPERIENCE SOLIDWORKS® available!”.
- Click : Access my 3DEXPERIENCE platform.
This step uses a license. The first user becomes the platform administrator.
- Log in using your 3DEXPERIENCE account
- Or create a new account if needed

Direct platform access :
https://eu1-ifwe.3dexperience.3ds.com
- Confirm administrator access
- Accept the Customer License and Online Service Agreement (CLOSA)
Step 2 : Verify roles and licenses
- Single-license environments are usually configured automatically
- In other cases, roles must be assigned by the administrator
Step 3 : Start the installation
Launch SOLIDWORKS from the platform
- Click the Compass icon (top left corner)
- Search for SOLIDWORKS
- Open the application

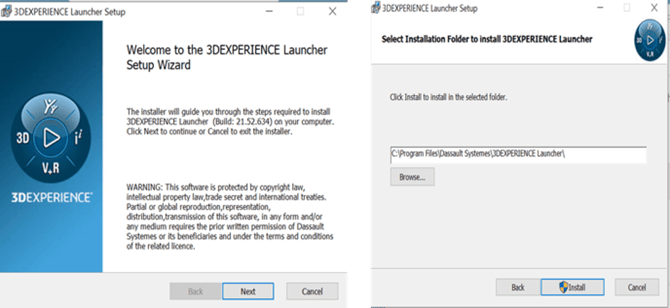
Install the 3DEXPERIENCE Launcher
-
Download the 3DEXPERIENCE Launcher

- Run the installer and follow the instructions
Step 4 : Install SOLIDWORKS
- Click Continue

- Select Install all granted roles

Step 5 : Choose your installation mode
During setup, the Installation Manager will ask how updates should be handled.
Select : Choose the version to install and update on-demand

Why this option is recommended :
- Enables future modifications of SOLIDWORKS
- Allows you to add new roles or components later
- Provides better control over updates
- Allows you to install year T or T-1 versions (example : In 2026, you can install the 2026 version or the 2025 version).
Warning : As indicated in this option, administrative privileges are required to use this feature.
Step 6 : Install the required version of SOLIDWORKS
Once the 3DEXPERIENCE SOLIDWORKS Installation Manager is installed, as previously explained, you can launch it and select the SOLIDWORKS version you want to install.
-
Choose either the T or T-1 version of SOLIDWORKS (in this example,T-1 : 2025).

-
Click on Install.

Step 7 : Launch SOLIDWORKS
- Return to the Compass
- Click on SOLIDWORKS.
The application is now ready to use.
Report this problem!
a. Problem solved? Let us know so that we can prevent it from happening again!
b. Still not working? Contact us too!
Contact : support@ohmycad.com